
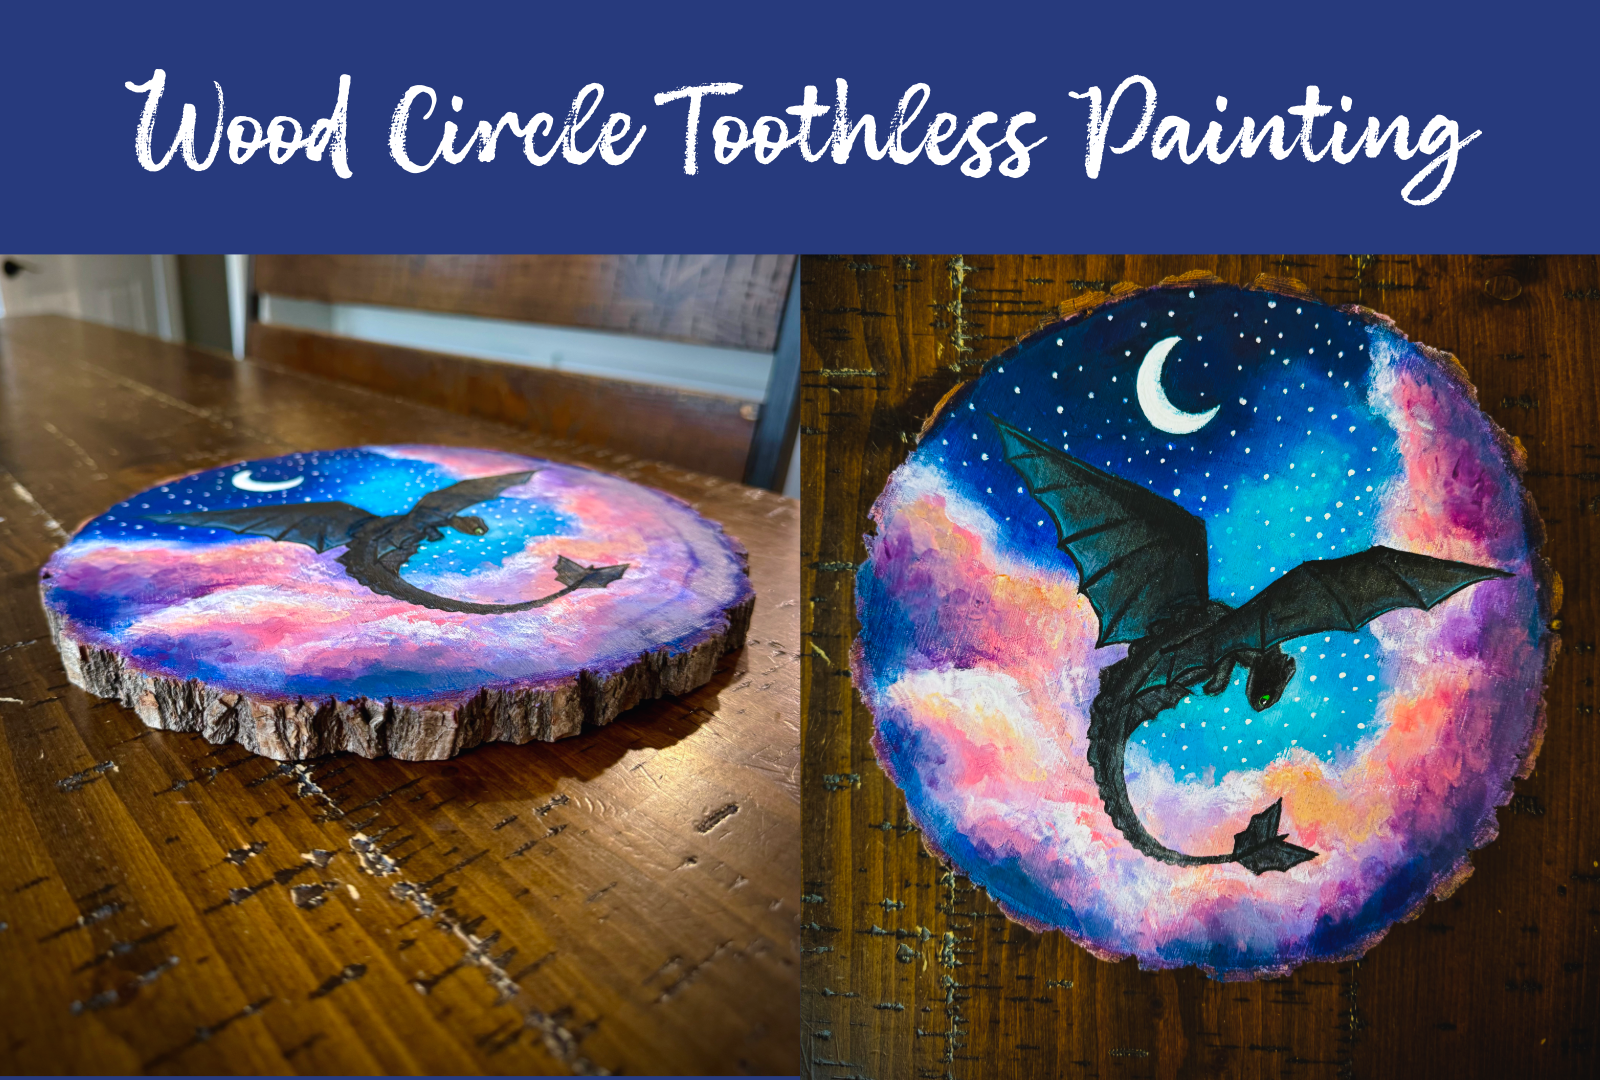
My friend is a huge How to Train Your Dragon fan, so I made this Toothless painting for her as a gift when I visited her on the West Coast earlier this summer! I love making paintings on wood craft rounds – it’s so fun to paint on and the real bark edges create an awesome natural frame that fits great with most home decor! I recorded a timelapse of the process in case anyone wants to recreate it. Here’s how to make it and where you can get the materials to create wood round paintings of your own.

This post may contain affiliate links, which means that I may earn a commision if you make a purchase from these links at no extra cost to you.
Step 1: Natural Wood Round Base

You can find natural wood rounds at certain crafts stores and Amazon. I prefer the 11″ to 13″ inch wood rounds, but sometime it’s fun to paint in different sizes and make mini ones! There’s a whole variety sold. Here’s a link to my Amazon page with all the materials you might need for this.
Once you get the wood, I recommend sanding them with a manual or electric hand sander – the wood surface needs to be extra smooth to make the painting process easier. This is optional since they’re usually sold already sanded, so just double check each wood piece before painting and use sandpaper on any rougher ones.
If the wood is sanded to your liking, you can apply a coat of Mod Podge to fill in any small cracks and prep the surface for painting. This is also technically optional, but the paints will be easier to work with and blend better if you coat the wood with Mod Podge beforehand. (Trust me, it’s super helpful.)
After the Mod Podge dries, your wood rounds are ready for painting!
Step 2: Painting on Wood
Painting on wood is a little different than painting on paper or canvas. It’s still possible to get the paints to blend nicely though despite the wood absorbing everything a lot quicker.
I like to sketch out what I’m planning to paint so I get a good idea of the composition. Since most of the pencil marks will be covered by paint, I’ll usually take a photo of the final sketch to use a reference while painting.
It’s a good idea to paint from background to foreground with acrylics. I always start with the sky first, then the midground elements, then finally the foreground.
For certain layers, I sometimes mix the acrylic paints with water to help everything blend better and absorb into the wood. Similar to oil painting, I’ll also sometimes start with a base layer of white (or a lighter color) then slowly blend in other colors.


Step 3: Sealing the Painting
Apple Barrel paints usually hold up really well, but if you want to protect your painting you can seal it with an acrylic sealer or Mod Podge!
Wood round paintings make such fun and amazing gifts for friends and family – my friend loved it! They’re also much cooler than regular canvas paintings (in my opinion of course) and fit with almost any type of decor.
Are you going to try this project? Comment your thoughts and ideas below!
And don’t forget to check out my Amazon page for links to materials you might need making this! Happy crafting!




Leave a Reply